The Best Fluffy Pancakes recipe you will fall in love with. Full of tips and tricks to help you make the best pancakes.

Transforming Your Kitchen: The Ultimate Guide to Painting Kitchen Cabinets
Contents
- Transforming Your Kitchen: The Ultimate Guide to Painting Kitchen Cabinets
- Why Paint Your Kitchen Cabinets? (Spoiler: It’s Brilliant!)
- Choosing Your Perfect Cabinet Color
- DIY Cabinet Painting: Your Battle Plan
- Paint Selection: Not All Paints Are Created Equal
- Pro vs. DIY: The Real Talk
- Maintenance Tips
- Final Thoughts
Hey there, kitchen warriors! Ready to give your cooking space a jaw-dropping makeover without breaking the bank? Painting kitchen cabinets is your secret weapon.

Why Paint Your Kitchen Cabinets? (Spoiler: It’s Brilliant!)
Let’s cut to the chase. Painting kitchen cabinets isn’t just a quick fix – it’s a total kitchen transformation superhero move:
- Budget-Friendly Makeover: Goodbye expensive renovation, hello stunning refresh
- Instant Style Upgrade: Transform dated cabinets in days, not months
- Endless Color Possibilities: Your kitchen, your rules
- Preserve Existing Layout: No demolition required
- Massive Visual Impact: Maximum wow, minimal effort

Choosing Your Perfect Cabinet Color
Pro tip: Color is everything. Here’s what works right now:
Hot Color Trends
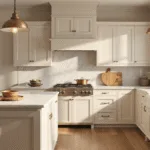
- Crisp white (never goes out of style)
- Moody sage green
- Sophisticated charcoal gray
- Dramatic midnight black
Color Warning: Always test paint samples BEFORE committing. Trust me, you don’t want a color disaster.

DIY Cabinet Painting: Your Battle Plan
Essential Toolkit
- High-quality primer
- Cabinet-specific paint
- Sandpaper (multiple grits)
- Quality brushes/rollers
- Cleaning supplies
- Patience (lots of it!)
Step-by-Step Transformation
- Prep Like a Pro
- Remove ALL hardware
- Label doors/drawers (future you will thank me)
- Deep clean surfaces
- Sand everything thoroughly
- Priming Magic
- Use professional-grade primer
- Allow 24-hour drying time
- Light sanding between coats
- Painting Technique
- Thin, even coats
- Use high-quality brush/roller
- Minimum two coats
- 16-24 hours drying between coats

Paint Selection: Not All Paints Are Created Equal
Look for:
- Furniture-grade durability
- Low VOC
- Semi-gloss or satin finish
- Easy cleaning properties
Recommended Brands:
- Benjamin Moore Advance
- Sherwin-Williams ProClassic
- Behr Urethane Alkyd

Pro vs. DIY: The Real Talk
DIY Pros:
- Save significant money
- Personal satisfaction
- Complete creative control
DIY Cons:
- Time-consuming
- Requires precision
- Potential for mistakes
Professional Option: If you’re not confident, hire experts. Sometimes professional touch saves headaches.

Maintenance Tips
- Use gentle cleaning methods
- Avoid harsh chemicals
- Touch up chips promptly
- Expect some wear over time

Final Thoughts
Painting kitchen cabinets is like giving your kitchen a facelift without the astronomical price tag. With proper preparation and technique, you’ll create a space that looks professionally designed.
Remember: Patience is your greatest tool. Take your time, follow steps carefully, and your kitchen will thank you.
Happy painting, friends! 🎨🏠
This post may contain affiliate links. Please see my disclosure policy for details.